Wednesday, September 14, 2011

School and other things

Well it's official. BOTH of my kids are in school now, and I just can't believe it!  They both had great first days.  They love ALL their teachers, bus drivers, etc. so things are good.  They were both nervous about their first day, especially my littlest.  She said she was excited about going, but she didn't want to go without me.  I had come across a few good ideas, like sending your child in with a little felt heart that they can put in their pocket, or a family picture etc. However, I know my children, and they would definately drop or misplace something like that, potentially resulting in a meltdown. Sooooo, I made them little flowers for their backpacks and sewed them on.

My oldest wanted some sort of decoration for her backpack anyways, and I thought this would be perfect.  I used the pattern from Mollie Makes, but changed the size, and added more in the middle.


I used a mixture of school glue and glitter glue diluted with water on the felt before hand, to give it some sparkle and more stability.


Then I added some ribbon, and sewed it already on the backpack loop, and added a cute little button.  I suppose the idea of sewing it on isn't for everyone, but unless someone cuts it, they are not coming off, so I don't have to worry about the kids getting upset.  You could also make the ribbon shorter and sew it onto a keyring for a gift.


The girls were so surprised and absolutely loved them!  When they came home, both of them said that when they looked at the flowers, they thought of me and they weren't so lonely. Mission accomplished!

They seem to like all the things I have made for them, better than the store bought stuff still. Especially my oldest.  I hope that as they get older, they will still share my love of homemade...

Only time will tell.

-Kelly

Monday, August 22, 2011

How's it going?

Sorry I haven't been writing.   Been so busy/distracted with going to the hospital, Dr. appointments, and getting things all set for the kiddos going back to school.  So sad that it's that time already.  I miss them so much!

Dr. said I should rest when I can, so I've been able to get some crafting done during my 'downtime' :)  I've been working on hexies (surprise surprise) and I've gotten quite a few made and stitched together this weekend.  I have a bunch of projects involving hexies, so any chance I get, I work on them!


I've also been knitting a scarf for my mom-in-law for Christmas.  Not finished with it yet, but getting there.  It's so soft and pretty. I love it, and hope she does too!


I'm still working on a lot of toy projects, as my littlest one's birthday is coming up, and of course Christmas.  Play food, doll clothes and accessories, linen and calico stuffies and playsets, etc.

This is from one of the play sets I'm making.


I have to finish embroidering them, then I'm going to sew them to the backings and stuff them. I think everything is turning out beautifully so far. Once I finish all the pieces to the set, I'll definately post pics!

I cut out some of the pieces for the gazillion strawberries I'm making.  These are just the top parts.


My littlest one likes the itty bitty felt ones I made so much, but she says she needs a million more....in a gigantic basket.... and they can't just be red.  There HAS to be red, and blue and purple and pink!  So, I'm making as many as I can before her birthday, in all different sizes, in the colors she wants.  I think she's going to be really surprised!  Will post pics when I'm finished with these as well.

Well, hope everyone is having a great summer.  It's not quite over yet, so lets enjoy it while we can!!!

-Kelly


Monday, August 1, 2011

Kim's Pillow

Here's a wonderful pillow that I made called Kim's Pillow.


Very orange. Very cute.  Here's how I made it!

First, go check out your fabric stash, and pick out which color(s) you want to use.   I chose about 8 different shades of orange. Then you have to make a bunch of 1 inch hexagons. Make as many as you would like, depending on how large you would like the pillow to be.  If you've never done english paper piecing, here's a great tutorial on how to make the hexies :
http://melissagoodsell.typepad.com/day_to_day/2011/02/fabric-hexagon-tutorial-by-bella.html

and if you don't have a hexagon pattern, here's a wonderful printout from texasfreckles.com :
http://texas-freckles.googlegroups.com/web/One%20Inch%20Hex%20Coloring%20Page.pdf?gda=vCjunWEAAADH46W6sZbbcSBivt0WAY7AmHW1yguyKbLuiDn2BAILoGsARUmSvtEkTHaI2-vGq-t1cNjHFSO5xdB8CiW53Y7NTxryxxKs0yoN45bW2buj_1MJP-kItwVPBwjdKujmMDOVcV4Kf5x1iV4X6-2IalYA

Ok! By now you have all your hexies made. Next you will need to stitch them all together if you haven't already.  I didn't make a pattern with mine, I just made sure that none of the hexies with the same fabric were next to each other.


Even up the edges, pick out a fabric for the back of the pillow, and cut it at least an inch biggger than the topper. You're going to be embroidering the back, so if you want to use a hoop, make it even bigger!  Choose the colors of embroidery floss you would like to use.  I chose 3 different shades of orange DMC floss, numbers 742, 946, and 3340. Then, start stitching!


You can embroider whatever you wish.  A design, a saying, etc.  I embroidered an uneven running stitch, and freehanded it for a more organic look.  When you are done embroidering the back, pin the front and the back facing each other, and sew around the edges, leaving about a 2 inch opening


invert, stuff, use an invisible stitch to stitch up the opening, and you're done!


Tuesday, July 26, 2011

Crafting, and birthday what-nots

I've been super busy lately with the usual house, kids, family stuff.  However, I've also been embroidering like a mad woman, trying to get birthday presents for certain special people done on time. I'll write more about them and post more pics when they are completed, but for now here are some sneak peaks.


and....


This last one is a toy that I'm making for my little one.  It's embroidered from a pattern out of a wonderful e-mail magazine I receive called Teapot.  If you are interested, go check it out here http://melissagoodsell.typepad.com/day_to_day/teapot.html.  It has all sorts of crafty goodness, and the ladies that write it also have amazing blogs that you should really check out!  Well, I'm off to stitch!

-Kelly

Thursday, July 21, 2011

Homemade is AWESOME!

I have gotten so many wonderful, thoughtful gifts in my life, but nothing touches my heart more, than something handmade. Whether it's a hand drawn card, a quilt, a thoughtfully crosstitched picture, or macaroni jewelry, it's all a beautiful work of art. Something someone cared enough to put time and effort into, for me, or my family. All of it means so much, and today I thought I would share some pictures of some handmade gifts, that I think are fabulous!

A crosstitch that my mom made for my eldest daughter. I am absolutely in love with it! She made one in purple for my youngest, and has made some for my cousin's girls as well.  It's such a beautiful pattern.  I love the frame that it's in too, I think my dad does a great job framing all of my mom's pieces!


A doll blanket from my grandfather.  He's the one that taught me how to knit. He and my grandmother would do practice swatches to get used to a pattern before they made a whole blanket, and I got a new doll blanket.  Makes me smile and think of them both everytime I see my girls wrap it around one of their dolls.


These are my girls' first attempts at needlepoint on plastic canvas.  I think they are great, and I love that they came up with their own ideas, like adding the jewel stickers to them.


 Beautiful quilts that their Grandma Jan made for them. This one was before C was born.


This was for after she was born and we knew it was a girl! (we let it be a surprise with both)


This was for my youngest, after she was born. The picture doesn't do it justice...it's absolutely amazing, the attention to detail, the quilted horses!  Love it!


A baby blanket I got from my Aunt Bonnie at my baby shower. I've put away most of our baby blankets but not this one.  I couldn't, it's just so beautiful!


A doll that C's Grandma M made for her. So adorable, she plays with it almost everyday!  She made the cutest little red woolen outfit for it as well that'll I have to take a picture of next time she puts it on her.


The most coveted blanket in the house, also made by my wonderful mother-in-law!


And a pillow I've had for almost my whole life. My mother made it for me and it's been on my bed, everywhere I've ever lived.


Thanks to all the wonderful people out there who make homemade, and who appreciate homemade!

-Kelly


Felt flowers, and other projects

My husband bought me a copy of Mollie Makes a couple of weeks ago.  I was so happy we were able to get a copy here.  It's printed in the UK and is a lovely magazine!


All sorts of crafty goodness!  As you can see, it comes with a wonderful craft kit on the front, and I finally made mine last night.


Super cute!  I think I'm going to whip up a few more in different colors for some wonderful little girls I know...


Thursday, July 14, 2011

Let's Go Fly a Kite


Been super busy, going through our stuff, organizing, etc. Took a break though for some much needed time with the family.

It was the 1st time that either of the girls had flown a kite, and they were super excited!


We all had a great time, and played a lil on the playground too!


Hope everyone is having a great week!

-Kelly


Saturday, July 9, 2011

Camping Bed Tutorial

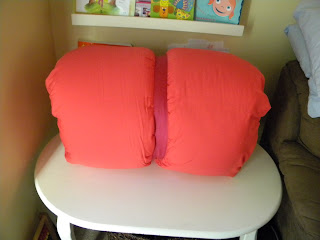
Have you ever went shopping for the right camping bed, and none of them were quite what you wanted?  You get one of the foam ones, and they're quite flat.  You get an air bed, and well, it's an air bed. Well, I wanted one that was as comfortable as my favorite pillow, and I didn't have a lot of money to spend, so I made my own, out of pillows. It's quite simple.

First, you have to get the amount of pillows you want.  I used 4, 2 ultra firms in the middle, and 2 firms on the ends.  ( I would suggest 8 if you wanna make a double) Then, you stitch them together on the seams. I did mine by hand with DMC floss for added strength, but if you pushed most of the loft to one side, you could probably do it on a machine as well.


Your seam will look like this. Sew them all on the same side, so that the stitches will be on the bottom part of your bed.


This is what it should look like when you've sewed all the seams.


I wanted to make a cute cover for it (I'm still going to and I'll post pics when I do) but I'm short on time, since I need it for tonight.  So, I took a twin fitted sheet, and put it over it.


Even though it is slightly big for it, the elastic keeps it on there nicely!  Then, just take some wide ribbon,(or make your own out of fabric) and cut a 42" piece (more or less depending on the thickness of the pillows you chose) Fold the ends over 1/2" and hem them so they don't fray. Then sew on a fastener, such as snaps, or velcro.  I chose velcro squares.  Now roll up your pillow bed, wrap the strap, fasten, and you're ready to go!


Not the prettiest thing in the world with the fitted sheet (once again, beautiful covers will be made SOON) but oh so comfy! C-babe gives it 2 hands up!


And, if you kept all the seams to the same side, it becomes a comfy seat as well.  You can use it just about anywhere. Happy camping!


-Kelly


Wednesday, July 6, 2011

Cleaning, and summer crafts.

Cleaning today, making a lot of progress (I think!)  Hoping to get some sewing in later, after all the scrubbing and organizing.  The kids and I made some 4th of July pinecones the other day:


and of course they want to keep them out for a while! So I told them we could keep them out until the end of the week.  By then, we most likely will have made a craft to take it's place. 
So far this summer we have made the festive pinecones, plastic bag parachutes for their Rapunzel's that they launched from upstairs at G&G's:


 "Slime" for the girls to play with. It's goopy, and messy, but oh so fun for the kiddos!


Stand-up fairy cards in the girls fave colors.


Jewelry with pony beads and crochet string


and some glow-in-the dark bead jewelry that they wore to fireworks.


Wonder what we're going to make tomorrow?


Search This Blog